Wednesday, November 27, 2013

You put the lime in the coconut... cookies

These cookies. THESE COOKIES. I brought them to work (secretly to fatten up my coworkers because they're all looking a bit peaky), and they were DEVOURED. And I even got a few people dancing, because I renamed these cookies "Lime in the Coconut" cookies. Not sure why the previous blogger/inventor of this recipe didn't do this. Every now and then I have a stroke of genius... I think this was one of those moments.

This recipe: Chewy Key Lime Coconut Cookies by Will Cook For Smiles
What I changed: The name! These shall now be called "Lime in the Coconut" cookies. People will dance and be merry. Additionally, I used unsweetened shredded coconut, because this recipe already has a lot of sugar. Also, I didn't use key limes, because I didn't have any. Regular limes are approved for this recipe! Finally, there's a lot of "room temperature" this and "warm" that in the original recipe. We're going to ignore most of that, it makes the dough realllly wet and hard to work with.

Ingredients:
- 2.25 cups all purpose flour
- 1/2 tsp baking soda
- 1 tsp baking powder
- 1/2 tsp salt
- 1 cup shredded coconut (I used unsweetened)
- 1 cup granulated sugar
- 1/2 cup butter, softened
- 3 oz cream cheese at room temperature
- Zest of 1 lime
- 1 large egg
- 1 Tbsp milk
- 1 Tbsp lime juice
- 1/2 cup powder sugar (for rolling cookies)

STEP 1:
Whisk flour, baking soda, baking powder, salt, and shredded coconut together in a medium bowl, set aside.

Using an electric mixer, cream together the sugar, cream cheese, lime zest, and butter until light and fluffy. "Creaming" together something is basically when you mix together sugars and butter. Vocab lesson! (Ok, enough of that)

STEP 2:
Add the egg, milk, and lime juice until just mixed in.

Add in the flour/coconut mixture 1/3 at a time until just mixed in.


STEP 3: 
Preheat the oven to 350 degrees at this point.

If the dough is too wet for you to work with, pop it in the fridge for 30 min.

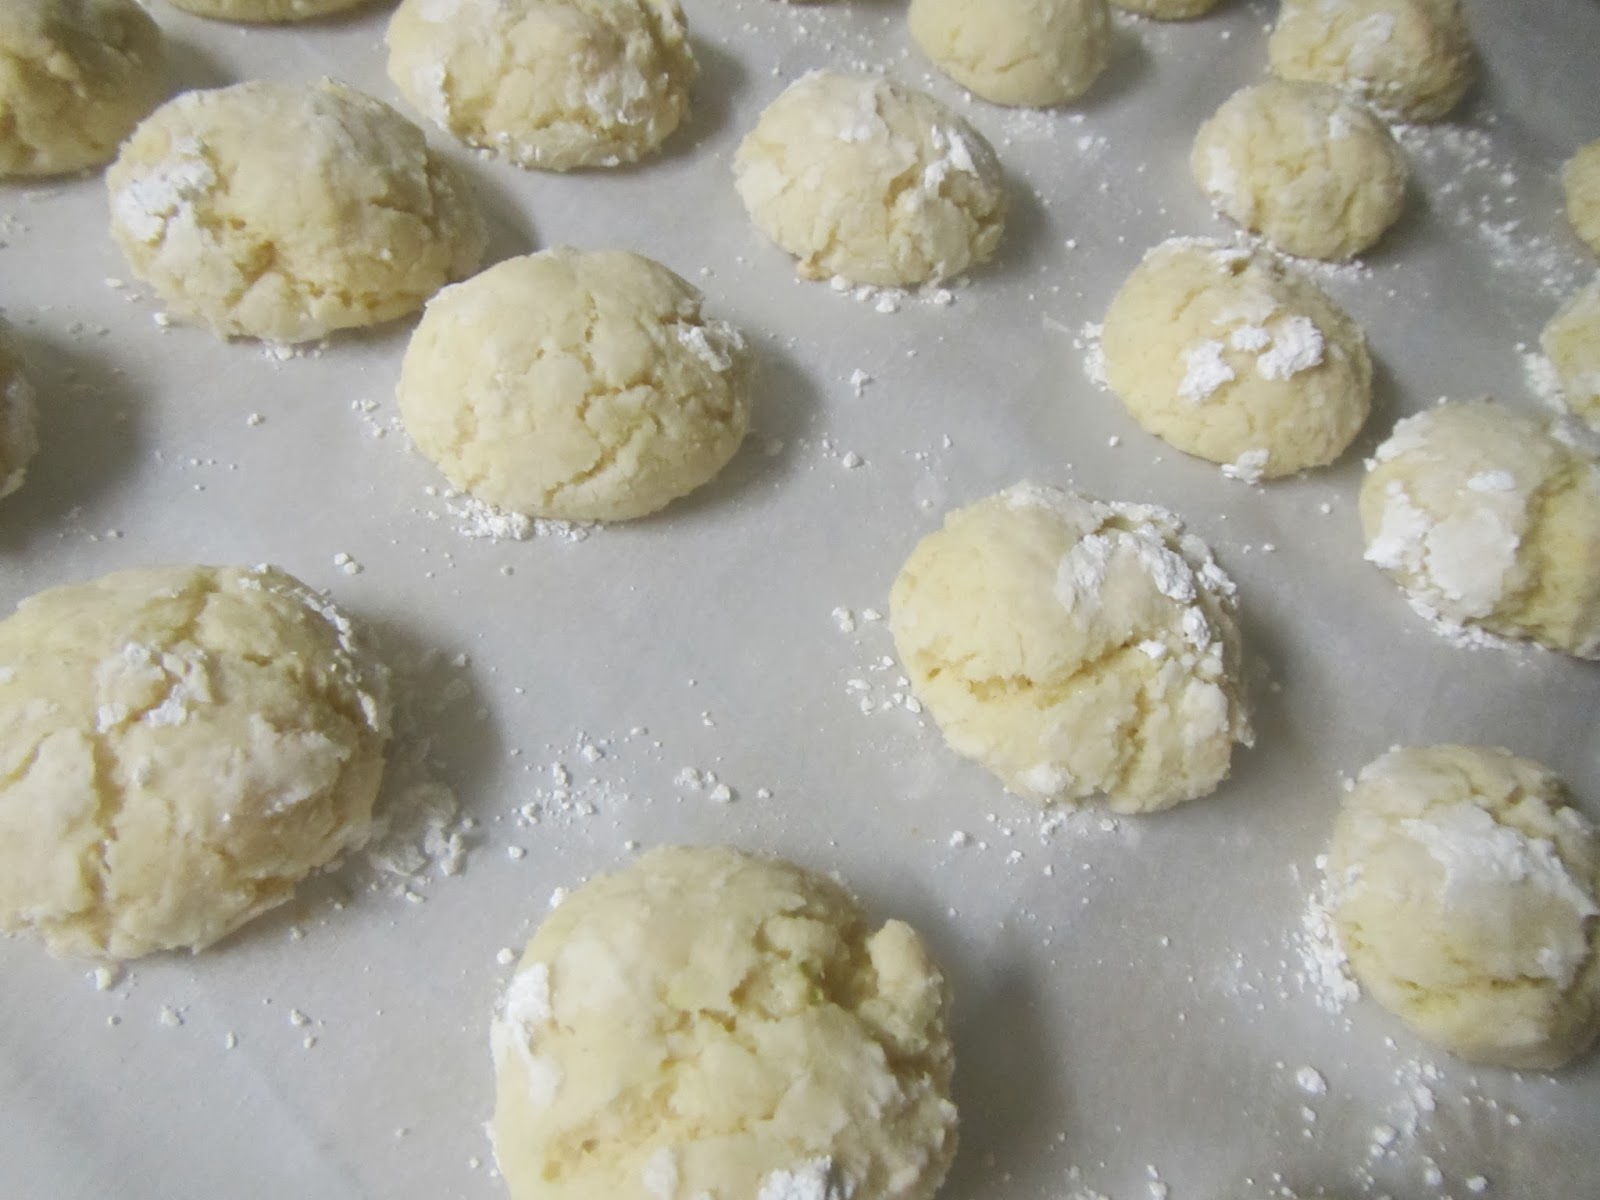
Form 1 inch balls, lightly coating them with sugar as you put them onto a baking sheet covered with parchment paper. Note: This is only half of the recipe! I got maybe 25-30 cookies out of this recipe.


STEP 4: 
Bake for 11 to 12 minutes, let them cool for a couple minutes, then try one. And yes, you can thank me (and the originally blogger if you want, I guess) by leaving a comment of joy. Or post lyrics from "Put the Lime in the Coconut" by the Baha Men. Either would make me happy. 


Sneaky sweet potato pie

So you're all like, "What? Sweet potato pie? That's ludicrous." And I'm all like, "No, it tastes like a heartier pumpkin pie! Really!" So now you have to make it just to see if I'm right. Right? (Just go with me on this one) But really, if you want to change up the Thanksgiving dinner a little without your family noticing because they'll get mad (**cough cough MY FAMILY cough cough**), then this is your way!

This recipe: Sweet Potato Pie by Gina at Skinnytaste
What I changed: Nothing! Except using my own homemade pie dough instead of store bought (but no shame in using store bought!)

Ingredients: 
- 2 sweet potatoes, roughly 1.5 lbs (the orange ones! Technically these are yams. Deep breaths! I know, the commercial vegetable and fruit industry frustrates me too)
- 2 Tbs unsalted butter, softened
- 3/4 cup packed light brown sugar
- 1/2 cup milk
- 2 large eggs
- 1/2 tsp pumpkin pie spice
- 1/2 tsp ground cinnamon
- 1 tsp vanilla extract
- 1 pie crust: 9 inch if you're buying it from a store, or one single crust pie dough recipe (I use pretty much any pie crust recipe you find on Smitten Kitchen)

STEP 1:
Cut your sweet potatoes into biiiig discs (see photo). Boil these suckers for about 30 min, until the skin looks like it's coming off and you can easy pierce the potato with a fork. Drain out the water in a colander and run cold water over the potatoes. Take the skin off.

STEP 2: 
Throw the meat of the potato into a food processor, blend it for a minute or so, until all the fibers of the potato are gone.

STEP 3:
Preheat your oven to 350 degrees F. 

Roll out your pie dough and place it into your pie tin, leaving 1 inch of the dough hanging over the edge.


STEP 4:
Put your sweet potato puree into a medium sized bowl. Add the butter - your puree will probably be warm, so your butter should melt. If it doesn't, just mix it well enough that the pieces of butter are well distrubed in the mix. You can use an electric mixer or just a whisk for this next part: add the sugar, milk, eggs, cinnamon, and vanilla. Mix until smooth.

STEP 5:
Pour the mixture into your pie tin, smooth it out with a rubber spatula, fold the extra pie crust that was hanging over the side to make your pie crust edge.

Pop this sucker into the oven for 55-60 minutes, or until the middle of the pie has set. Let cool for 10 minutes. Cut and serve with cool whip or whipped cream or whatever makes your heart happy.

Yes, that is ANOTHER gallette in the background. Yes, I took photos. Yes, I will make a blog post about it.
No, I am NOT sorry.
 And there you have it! You have snuck something new into your family's Thanksgiving and they will have NO idea until they are complimenting you. Then you can let the bomb drop. BOOOOOOM!


Tuesday, November 19, 2013

Bestie bombs and pumpkin chocolate chip cookies

BFF and I bestie bomb each other from time to time. A bestie bomb occurs when one half of the bestie couple is having a really bad day or week, and the other half of the bestie couple decides they could do with some cheering up. So, BOOM - they get bombed by love. This works best if you have a key to your friend's place and can sneak surprises into their house while they're gone at work or on an errand.

It works out really nicely because the sad bestie feels better, and the bestie-that-was-sad-because-their-bestie-was-sad also feels better. It's a great circle of love. I was most recently bestie bombed on my birthday in July, and I bestie bombed BFF a few months ago or so when she was having a particularly bad week.

So spread the love! Go bestie bomb your BFF!

And in the bestie bomb basket, you can provide them with this: Pumpkin chocolate chip cookies by Two Peas & Their Pod
What I changed: Nothing! You don't mess with this perfection!

Ingredients:
- 3 cups all purpose flour
- 3/4 tsp salt
- 1/2 tsp baking soda
- 1/2 tsp baking powder
- 1 tsp ground cinnamon
- 1/2 tsp ground nutmeg
- 1/2 tsp ground ginger
- 1/4 tsp ground cloves
- 1 cup butter at room temperature
- 3/4 cup packed brown sugar
- 1 cup granulated sugar
- 1 large egg
- 2 tsp vanilla extract
- 1 cup pumpkin puree
- 2 cups chocolate chips

STEP 1: 
Preheat oven to 350 degrees F.

In a medium bowl combine all your dry ingredients (the first 8 ingredients).


STEP 2: 
In another mixing bowl, use an electric mixer to cream together the sugars (both brown and white) and butter for about 3-4 minutes until it's light and fluffy. Add the egg, vanilla, and pumpkin and mix until it's a homogenous mixture. Add in the dry ingredients from Step 1 1/3 at a time, until it's all just combined. This will be a very thick mixture, so be careful it doesn't creep up the shaft of your mixing paddles!


STEP 3:
Fold in the chocolate chips. YUMMMMM.


STEP 4: 
Drop the batter onto a parchment covered baking sheet, a heaping tablespoon or so. Pop these bad boys into the oven and bake for 10 minutes, where the cookies are juuuust beginning to brown around the edges. After the cookies have cooled for a minute or two you can transfer them to a wire rack.

AND THEN EAT THEM ALLLLLLL (with your BFF).


Savory pumpkin gallette

Why why did I decide to call this blog the Cooking Lair?

First off, I love the word lair. It is definitely not used enough. My favorite is when Eddie Izzard makes fun of people for thinking transvesties are evil, and mentions inviting women back to his lair. He says it so great. Now I have to listen to his stand up! I tried to find a youtube clip for you, but apparently no one else likes that bit as much as I do.

Since I started cooking and baking pretty much every day, the number of cuts I have received on my left pointer finger have increased exponentially. I thank my nails EVERYDAY for saving the tip of my thumb at least twice now. When I chop and mince, I do it with FEELING. And passion! And pain, apparently. Don't worry, anyone that has had my cooking, I have never given you something with my blood, skin, or nails in it. Here are some safe techniques for cutting things with big knives: Basic Knife Skills (don't ask me how I feel about allrecipes.com, because I'm not a fan of the recipes. But this video was decent!) - I obviously need to memorize the part of the video about curling your fingers so the pesky buggers don't get in the way.

Now that we're all feeling safe (I hope! haha), on to today's post (which involves cutting raw pumpkin into 1/4" slices, SO BE CAREFUL).

What recipe: Savory Pumpkin Gallette by Oh My Veggies
What I changed: So, I tried to change nothing. But as you'll soon see, I was not successful at cutting my pumpkin thin enough, mine end up being almost 1/2" thick pumpkin slices. But try for the thinner pieces, it'll turn out stupendous!

So, remember my obsession with gallettes? It hasn't dissipiated. Especially since I wanted to try making a savory gallette. Well, as we all know...  IT'S PUMPKIN SEASON. I know perhaps many people are sick of pumpkin, but I just can't get sick of it yet. I'm still very excited.

This savory gallette has a walnut parmesan sage base and it's SPECTACULAR. Here we go!

Ingredients:
- 1/2 sugar pie pumpkin, cleaned of innards and cut into 1/4" slices
- olive oil spray
- salt and pepper to taste
- store bought pie crust, or home made (See the pie crust I made for the sweet gallette, or any of them at smittenkitchen.com)
- 1 egg yolk + 1 tsp water for a glaze
Base:
- 1/2 cup walnuts, roasted (you can roast these in the oven with the pumpkin slices for 5-10 minutes or so)
- 1/2 cup shredded parmesan cheese
- 2 T olive oil
- 1 T chopped sage

STEP 1:
Preheat oven to 400 degrees F.

Carefully cut your pumpkin into 1/4" slices. Place them onto a baking sheet lined with parchment paper, spray with olive oil and sprinkle with salt and pepper to taste. Pop it into the oven for 20-30 min. They should be softened so you can pierce them with a fork, but not browned. While they cool, proceed to the next steps.


Pumpkin slices ready for the oven!
STEP 2:
Roll out pie dough - I rolled mine out to 12". Transfer the dough onto a baking sheet covered with a piece of parchment paper. A good way to do this is to fold your dough into quarters - this way your dough won't tear!


STEP 3:
Combine all the ingredients for the base in a food processor (and roast your walnuts if they aren't roasted - 350 oven, roast for 10 minutes or so). Process until the mixture appears coarsely chopped. Spread the mixture onto your rolled out pie dough, leaving a 1 - 1.5" edge free of the mixture.


STEP 4: 
Arrange the pumpkin slices in a gorgeous spiral that all your friends will be jealous of.


STEP 5:
Fold over that extra inch or so of dough so it covers the start of the pumpkin. Make your glaze and brush it over the exposed pie dough (as I have clumsily done here).


STEP 6: 
Throw this lovely creature into the oven! At 350 degrees F for 40-50 minutes (until the crust has browned).


And finally... shove it in your face after it has cooled enough to do so safely.